Introduction
At the end of my instructional design master’s degree at UCF, I had the opportunity to develop a website for AECT’s Education in the Health Professions–Special Interest Group (EDHP–SIG). Amid the pandemic, I struggled to find an appropriate instructional design internship opportunity. During a discussion with Dr. Hirumi in Spring 2020, we learned my web development skills could help further his initiative to launch an online presence for the Education in the Health Professions–Special Interest Group (EDHP-SIG). The instructional design connection was to implement a waterfall development model, similar to ADDIE, to design and develop a product for a client.
Systematic Approach
Similar to an instructional design project, a website design should be tackled with a systematic approach. I would have enjoyed employing an AGILE or SCRUM project management approach, but using a waterfall approach, see Figure 1, aligned better with the need for deliverables throughout the internship experience. This approach is similar to using ADDIE for instructional design with its linear approach to designing products.

Figure 1: Waterfall Model with feedback loops. Image adapted from Peter Kemp/Paul Smiths’ Waterfall Model of System Development, CC By 3.0.
According to Ruël, Bondarouk, and Smink (2012), waterfall approaches (figure 1) remain the most widely used project management methodologies. The strength of the waterfall approach is how easy it is for users to identify and understand the phases of the project (Ruël et al., 2012). However, the rigid phases and deliverables are also considered a weakness of the approach (Ruël et al., 2012). Proponents of other methods, such as AGILE, demonstrate the weakness when confronting “wicked problems” that may cause uncertainty and changes throughout the project process (Ruël et al., 2012). Provided the ease of understanding and the need to define the project, the waterfall approach was a good fit for developing the EDHP-SIG website.
Project Team
Requirements Phase
The requirements phase began with a review of the material provided by Dr. Hirumi. The materials included a content analysis document of other special interest groups, produced by Dr. de la Mora Velasco. Furthermore, a social media plan, mission/vision statement, and instructions to join the EDHP-SIG Listserv mailing list were provided.
The first step was to look at the project requirements and propose a platform & solution to use for the project. Using the content analysis document, I reviewed the websites looking for commonalities and directions to use for our project. It was already established the team preferred WordPress, so I recommended three different themes that could be utilized and provided an estimate of the costs associated with the project.
The next step was to conduct an analysis of the project and determine the proper direction for the design direction. The analysis document clearly defined the purpose of the project, the target audience, and the goals of the project. The analysis document also reviewed the social media plan and provided an in-depth look at the planned implementation of the resource wall. Finally, two similar websites were identified, and a quick analysis of positive aspects was provided, along with developer recommendations for how to proceed with the project.
Requirements Phase Reflection
I found it helpful to spend time at the front of the project, defining the goals for the project before the design begins. In previous contracting projects I’ve participated in, I have not given the requirements phase as much attention to the detriment of the process. I found the iterative process with Dr. Hirumi instrumental in building my overall understanding of the project goals.
The Requirements Document discusses the hosting requirements and potential WordPress templates to be utilized. Provides a cost estimate for launching and maintaining a website.
The Analysis Document discusses the team’s vision of the project and how the project will proceed. The analysis document was sent to members for feedback.
Design Phase
The design phase started by reviewing the analysis document created in the requirements phase. In reviewing the text, a consensus existed among the team for the features and overall layout of the project. I searched for a hero image for the website to establish the color palette and mood. Using Adobe Stock, I built a lightbox of potential pictures and began creating visual compositions, see figure2, based on the hero image.

Figure 2: EDHP-SIG Design Compositions
Each composition was also presented as a style board, see figure 3. Each style board presented the colors, sample images, as well as fonts, and type hierarchy for the visual direction. This detail allowed the viewer to see how the branding may be applied in different contexts beyond the website.

Figure 3: EDHP-SIG Comp 3 Style Board
Following multiple iterations with the project team, the document was shared with the EDHP-SIG ListServ for voting, comments, and feedback. As feedback was received from the group through email, their preferences were recorded in an Excel document. This Excel document was used to determine the final direction for the visual design. Below are the statistics for the vote and some comments used to forward the design direction.
Group Preferences
Design Comp 1
Design Comp 2
Design Comp 3
Group Feedback (Sample)
One of my thoughts or concerns about Comp three is the menu items being in the middle I’d rather than be on the top or most people expect to see them. It also seems a bit cluttered to have them in the middle of next to all the other text.
I like the #2 but think the main page should have more color vs. all the blue images. I like how #3 has the body with the different colors and headings.
I prefer option 3. The use of different colors helped chunk the information. The monotone on the others is a sophisticated and clean design; however, I found that I did not readily focus on the text in those two options.
Final Design Direction
Based on the group feedback and team discussions, it was decided to find a solution using the hero image of comp 1 with the design feel of comp 3, see figure 4. Using this direction, I proceeded to complete the visual direction for the project and begin the implementation phase of the project.
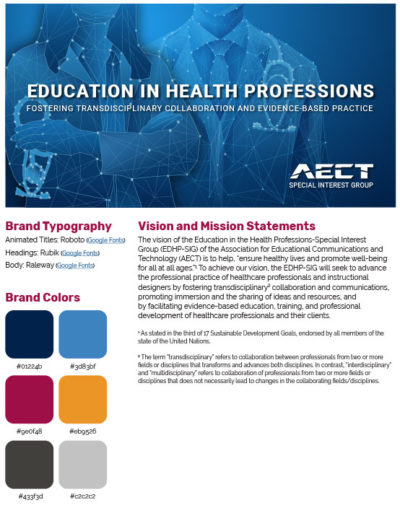
Figure 4: EDHP-SIG Style Guide
Design Phase Reflection
The design phase was a tough phase to work through. I went through many different images trying to find the correct pictures to demonstrate “education health professions” without getting too technical or doctor-specific. As with many stock image websites, there is an issue with diversity and inclusion that can make it more challenging to find the right images. Reflecting on the process, I think it went smoothly and quickly. However, I should have spent more time with the typography, which needed minor modifications as I entered the implementation phase.
A presentation of three visual directions for group consideration. Each visual direction includes fonts, colors, and sample imagery.
This document was revisited after the implementation phase to address changes and modifications made to the branding as the website was developed.
Implementation Phase
In the implementation phase, I started with the outcome from the design phase and began building the home page of the website. The development of the site was straight-forward using the block-builder system included with the Avada template. The hardest part of the project was completing the animation for the front page, see Figure 5. We went through several iterations of the animation to get a final animation the team agreed was satisfactory. For the last two iterations, I used my illustration and design skills to develop a female medical professional using the same style used in the stock image.

Figure 5: Front page animation options.
The website was developed concurrently with the hero image animation. Initially, we used a sub-domain on a production server to develop the site and then pushed the final website to a live server once the domain name was acquired. I documented the implementation process, see implementation document, to keep a selection of plugins and best practices for pushing a website from production to live status. Launching the live site was easy using GoDaddy’s Installatron tool.
Implementation Phase Reflection
In the implementation phase, I learned the value of slowing down and using storyboards for the animations. In the design phase, we spoke about the “hero” image being animated on the homepage. Instead of developing a storyboard and defining the animation, I chose to design and then modify the product. While the final product was a success, it took several iterations to achieve the groups’ vision. I could have avoided some of this work through storyboarding and attaining a client sign-off before starting work.
This document provides an overview of the plug-ins and tools utilized during the launch of the website.
Verification Phase
Once the website has been launched, it’s essential to work on tuning the server to ensure it loads quickly for the user. Without any optimization or caching plugins, the website loads in 3.57 seconds, according to GoDaddy’s performance tool. With the addition of WP Super Cache and Autoptimize plugins, the load speed was brought down to 1.68 seconds. This page-load speed represents a 113% performance increase over the standard installation. The following chart demonstrates the difference in optimization plugins.
Page Load Speed
Along with the optimization of the site, it’s essential to review the goals previously defined to ensure the project meets the requirements. See below for the goals established at the start of the project.
Goals Defined in the Analysis Document
Maintenance Phase
The maintenance plan for the website started before the verification phase ended. It’s essential to empower the group with the ability to maintain their website. With this in mind, I included links to the Avada help resources on the dashboard of the site, see figure 6. These links allow the administrator to explore and learn about the builder system built into the Avada theme. Furthermore, I recorded videos and explained how to perform simple maintenance items on the website. See the maintenance document to learn more about the resources provided.

Figure 6: Avada Help on the Administrator Dashboard
Maintenance Phase Reflection
The maintenance phase is all about empowering the end-user of the website. As a developer, I don’t mind maintaining websites and charging for the service. But, there is nothing inherently tricky with keeping sites updated and running correctly. When time permits, I would like to extend the documentation provided here and build a subdomain on my website to present this information to clients.
The maintenance document provides videos and instructions for maintaining the website.
References
Ruël, H. J. M., Bondarouk, T., & Smink, S. (2012). The Waterfall Approach and Requirement Uncertainty: An In-Depth Case Study of an Enterprise Systems Implementation at a Major Airline Company. In J. Wang (Ed.) Project Management Techniques and Innovations in Information Technology (pp. 49-65). IGI Global. https://doi.org/10.4018/978-1-4666-0930-3
Waterfall model (n.d.) In Wikipedia. Retrieved June 29, 2020, from https://en.wikipedia.org/wiki/Waterfall_model